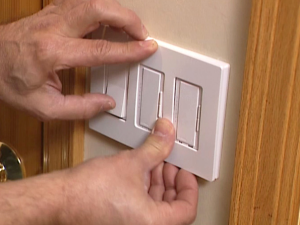
How High to Install a Light Switch
Before you get to wiring and mounting a light switch in a newly added or recently converted space without a wall outlet, learn how high to install the light switch for easy access and mounting.
Q: Our screened-in porch is undergoing some updates, including the installation of overhead lights and addition of a small outdoor kitchen set. Is there standard light switch height I should keep in mind?
A: There’s no hard and fast rule for the correct light switch height; rather, how high you should install your own will depend on your local electrical code ordinances and federal laws governing accessibility. Additionally, you may want to make adjustments to depending on its location in relation to other fixtures or switches in the room and the heights of those who will be using the switch most.
Find out if your local electrical code requires a specific light switch height.
The National Electric Code (NEC) doesn’t set forth a specific minimum light switch height, but your local electrical code may prescribe its own standard—you can usually find the electrical code on your city’s website. Keep in mind that not every city requires a specific minimum height.
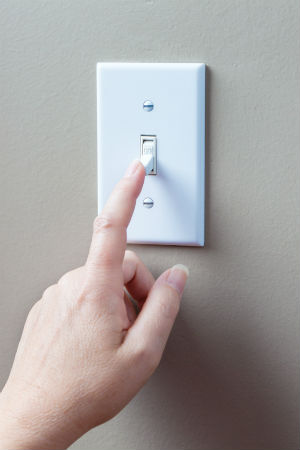
The ideal light switch height is 48 inches from the floor.
Builders generally use this standard since this height can be reached as comfortably from the standing position as from the sitting position. Moreover, it falls in line with light switch height ranges prescribed by the Americans with Disabilities Act (ADA) and Fair Housing Act (FHA). Even if your local electrical code doesn’t require a specific minimum height, these acts offer guidance when installing your light switch: According to ADA guidelines, wall controls and outlets that can be reached from a forward position need to be a minimum of 15 inches and a maximum of 48 inches above the ground to be easily reached from a seated position.
Now, the ADA accessibility guidelines apply to public buildings and very rarely to private residences, and the FHA accessibility guidelines apply to covered multi-family dwellings rather than detached single-family homes. Nevertheless, staying within their light switch height range regardless of your dwelling type is a mindful consideration that allows for easier accessibility when aging in place or recovering from an injury, should a household member ever spend time in a wheelchair—not to mention ensures the accessibility of your property for future owners or tenants
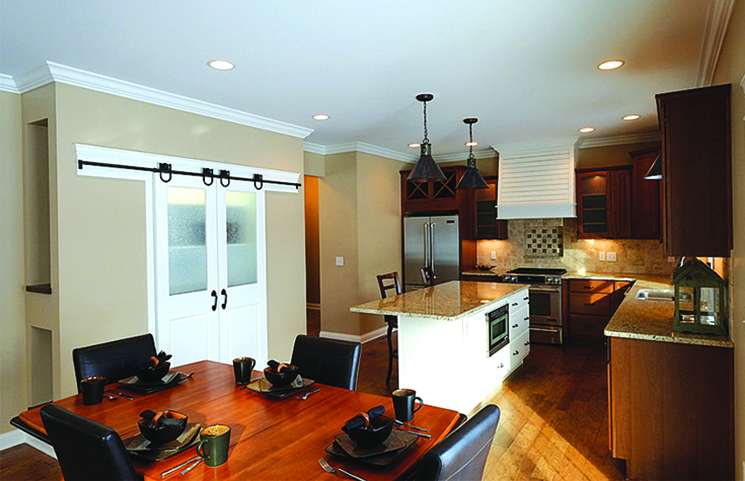
Adjust the height of switches mounted over countertops.
When mounting a light switch over a countertop—for example, in an indoor or outdoor kitchen, an art studio, or a craft room—reduce the standard wall mounting height to 40 inches. This lower light switch height will allow you to avoid interfering with higher-up obstructions on the wall like backsplashes or cabinetry, while still hovering four inches above the top of a standard 36-inch-tall counter.

Electric Cooker Installation Guide
Whilst only a qualified electrician is permitted to install a new circuit for an electric cooker, any competent DIY enthusiast is welcome to replace or upgrade their gas oven to an electrical alternative. This guide will talk you through the process of installing and wiring an electric cooker.
What Preparation is Needed to Install an Electric Cooker?
Firstly, you’ll need to be aware of your requirements. Electric cookers draw a great deal of power – more than a gas oven, because they generate a larger, more evenly distributed amount of intense heat.
With that in mind, you’ll have to be sure that you have a large fuse (the instruction manual of your oven will advise on this – you may get away with 13amps, but typically you’ll need something bigger), a thick, heat-resistant cable (consult a professional electrician if you are unsure of electric cooker cable size requirements) and an accessible double pole isolating switch.
Why Do I Need a Double Pole Isolating Switch, Rather Than a Single?
It’s all a matter of safety. While a single switch overrides the live wiring to your cooker should it need to do so, an oven uses so much power during an electrical circuit that the neutral wire may still be carrying some current. A double pole isolating switch will also power down the neutral wire, and thus remove the risk of residual electrical shocks should you touch the cooker after it has tripped.
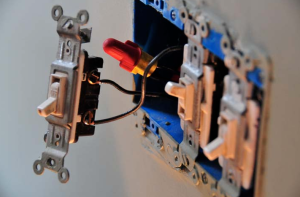
What Circuit and Cables are Needed to Install an Electric Cooker?
All electric cookers require their own radial circuit – it is inadvisable for an oven to share a circuit with another major kitchen appliance. Install a cooker control unit within two metres of the cooker, but never directly above it, and run a thick cable that is capable of supporting the amount of electricity that your oven will need to one side.
The Complete Guide to Switches and Sockets
Bathrooms – pull cord switch fitting and repair – Fitting a pull cord switch, replacing the cord or changing the switch. How to replace or change a pull cord switch in a bathroom, shower or wet room.
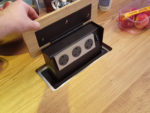
Electrical – concealed worktop sockets – Fitting pop up kitchen Worktop sockets – In this DIY guide we show you how to easily install a pop up kitchen worktop socket including how to work out where the hole needs to go and how to fix the unit in place
Electrical – lights and switches – How to fit lights and switches and wire a ceiling rose. Light switch not working? See how to fix in or rewire your lights and switches
Electrical – outdoor socket installation – Instruction and advice on how to wire and fit an exterior electrical socket
Electrical – socket heights – In this project guide learn about the height requirements of electrical sockets, light switches, intercom systems, tv sockets, phone sockets, door bells and worktop sockets in existing properties and new build properties
GUIDE TO RCD ELECTRICAL SAFETY SWITCHES: ALL YOU NEED TO KNOW
Getting RCD Electrical Safety switches installed in your house is an essential task. Ensure the safety of your family in the long run. Without RCD Electrical Safety switches, everyday tasks, using electrical appliances could turn disastrous in a blink of an eye. Orion is an Emergency Electricianprovider
WHAT IS AN RCD SAFETY SWITCH AND HOW DOES IT WORK?
Essentially, residual current devices (RCDs) are used for protection against direct and indirect contacts. An RCD prevents you from receiving electric shocks if you were to touch a live wire. RCDs provide protection from electricity ordinary fuses and circuit-breakers cannot offer.
The RCD is a device that automatically switches off the electricity running through if there is a fault. It operates by continually monitoring the electric current flowing through circuits. If any electricity is detected going through a path that is not intended, the RCD will stop the electricity from flowing through within 20 milliseconds.
TYPES OF RESIDUAL CURRENT DEVICES
For the usual types of RCD use within a household, there are only five different types of RCDs Within a household, there are only approximately five different types of RCDs
RCCB (Residual Current Operated Circuit Breaker)
An RCCB is a device that is used to make, carry and break currents under common conditions. However, it is not designed to defend against overloads or short-circuits. These types of RCDs must be used alongside an overcurrent protective device, for example, a fuse or circuit breaker.
RCBO (Residual Current Operated Circuit Breaker)
An RCBO is a device that is used to make, carry and break currents under common conditions. In addition to this, it is intended to provide protection against overloads and short-circuits. This means that it does not have to be used alongside an overcurrent protective device like the RCCB.
SRCD (Socket-Outlet incorporating a Residual Current Device)
An SRCD is an outlet used for fixed installations. It uses an integral sensing circuit which automatically causes the contacts to open at a predetermined value of residual current.
FCURCD (Fused Connection Unit incorporating a Residual Current Device)
A fused connection unit used for fixed installations uses an integral sensing circuit which automatically causes the contacts to open at a predetermined value of residual current.
PRCD (Portable Residual Current Device)
A plug with a residual current device and one or more socket-outlets. They may have overcurrent protection.
Cost to Install or Move a Light Switch
The factors that affect how much moving a switch will cost depends on whether you are adding wiring, a circuit breaker, the type and expense of the switch, and cost of labor charged by your electrician.
How Much Does it Cost to Install a Light Switch?
Although there are variables, the national average to add or move a light switch is $150. Homeowners typically spend between $100 and $200 per switch, though changing out several will reduce the cost of each.
The cost to hire an electrician average $50 – $100 per hour. Although the National Electrical Contractors Association (NECA) sets prices in your area, licensed electricians are not obligated to respect that amount. They might charge more or less based on the amount of work they have, overhead, and other fluctuations. Hiring local is best because they know the municipal codes and are more likely to pass inspection the first time.
Moving a Light Switch
The average cost of moving a switch is $100 – $200. When an electrician must cut a hole for a light switch where there wasn’t one previously, it might require repairs to drywall or sheetrock and wall coverings.
Replacing a Light Switch
Merely replacing a light switch because it’s broken usually costs less than $100, depending on the electrician’s minimum service charge, which typically gets rolled into the cost of the switch.
Three or Four-Way Switches
The three-way switch can control one fixture, but from two locations; such as at the top and bottom of the stairs and costs $3 – $15. Four-way switches cost $10 – $25 and can control a fixture from three places.
Dimmers: How They Work & How Much They Cost
Upgrading any light switch to include a dimmer allows the user to brighten or dim the lights depending on their needs. Although these dimmers are typically inexpensive, your home’s current wiring might need an upgrade, which will make it more expensive. For example, if you want to be able to control the brightness from two locations, you will need a three/four-way switch.